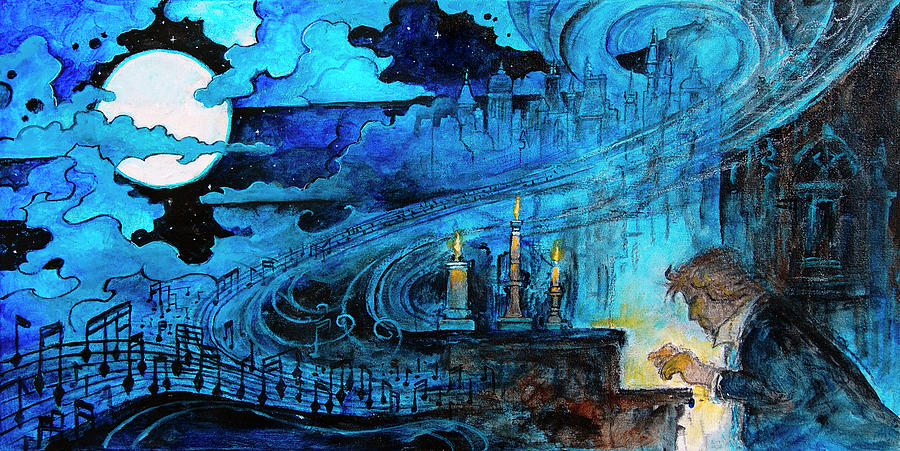
Beethoven under Moonlight
Beethoven under Moonlight using CSound
Introduction
During the Digital Audio module we’ve been given a basic introduction to CSound, a domain-specific programming language for audio programming. In class, we covered the basics of this language: the syntax, structure, a few syntesis techniques, and effects based on delay, distorsion and filtering. For the individual projects we each wrote a functioning Csound program in the form of an audio generator and/or a processing unit for incoming audio.
With these freshly-acquired knowledge about CSound and the assignment instructions I designed my idea. Sound effects are fascinating to me, but still a bit of a mistery; on the other hand, I have quite some experience with acoustic instruments (especially pianos). Having said this, I decided to ease into the world of digital audio by writing a CSound program that would imitate as closely as possible the sound of an acoustic instrument while “performing” a classical piece of music. For me, this was a theoretical assignment as much as it was practical.
In 2020 people all around the globe are celebrating the 250th anniversary of the birth of Ludwig van Beethoven (1770-1827). During the years I performed classical music, I played several pieces composed by him for piano and I always found them extremely… fullfilling to play and full of emotions. This, together with the special significance of this year inspired me to choose his “Moonlight Sonata” for the present assignment.
Fun fact:
This sonata was completed in 1801 and dedicated in 1802 to Countess Giulietta Guicciardi, his pupil. Its original name is The Piano Sonata No. 14 in C-sharp minor, marked Quasi una fantasia, Op. 27, No. 2. The popular name of Moonlight Sonata dates back to the remark of a musical critic sometime after Beethoven’s death.
Preparations & Resources
The principal resource of this assignment was CSound. I tried several methods of running it, for example the frontend CSoundQT with which CSound comes when installed, Cabbage and Winxound. Although I managed to make Cabbage work on my computer, it crashed quite a lot which got frustrating, so I ended up using a Visual Studio Code extension.
CSound has a pretty consistent manual, which proved to be an important resource. In order to understand more about this language programming and digital audio in general, I had to start with the basics and read about sounds, waveforms, pitch, frequencies and other realted concepts. This proved to be very useful for the next steps: understanding the basic mechanisms of sounds allowed a smoother transition to digital.
Program development
Theoretical background
In 1971 he wrote an article about stimulating real instruments.
While at Stanford University, John M. Chowning, an American composer, musician and researcher worked on finding ways to stimulate real instruments digitally. He developed something called Frequency Modulation synthesis (FM synthesis) which is a way of synthesising sound based on its frequency and amplitude: the frequency of a waveform is changed using a modulator such that the frequency of an oscillator is altered “in accordance with the amplitude of a modulating signal” (Chowning, 1973).
Using this synthesis method, both harmonic and inharmonic sounds can be created - for the former, the modulating signal has to be harmonically related to the original “carrier signal” (i.e., the sound grows more complex the more the amount of frequency modulation increases), while for the latter, modulators with frequencies that are not integer multiples of the “carrier signal” have to be used.
Implementing FM synthesis through analog oscillators can result in pitch instability, so the digital implementation quickly became standard practice. This is how digital FM synthesis began to be the basis of digital instruments starting from 1974. It was implemented using phase modulation(a form of angle modulation).
CSound implementation steps
Implementing a FM synthesis in CSound proved to be doable after understanding the concepts and the formulas. Below is a step by step explanation that leads to the final program (based on an example found online).
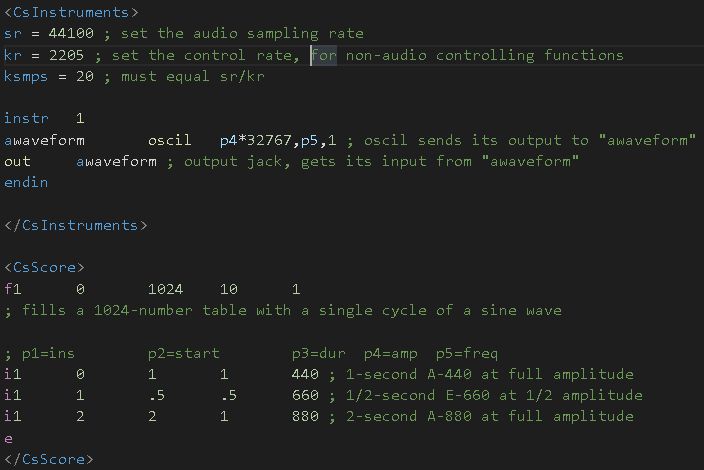
First step:
- Creating an instrument inside
<CsInstruments>that plays sine tones. - Creating an oscillator that gets the
amplitude,frequencyandwave shape. The parameters are all determinted by p-fields in the score file<CsScore>. This is also playing the role of the carrier oscillator.
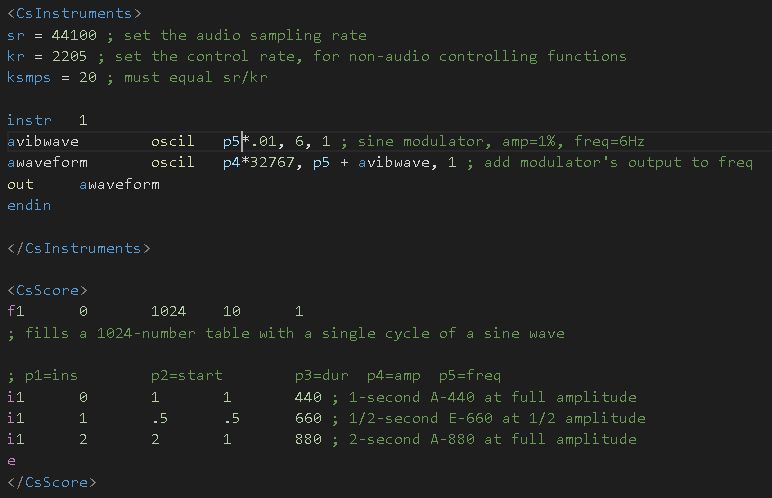
Second step:
- Creating another oscillator, the modulating oscillator, that will modulate the
frequencyof the carrier oscillator by adding the output of this oscillator to the frequency of the other one. - The
rateof the modulation (thevibrator rate) is determined by thefrequencyof the modulator, whereas thedepthof the frequency deviation is determined by theamplitudeof the modulator. - A subtle vibrato - deviation
depthof about 1/5 of a semitone and arateof 6Hz - in the carrier oscillator’s frequency is caused this way, by adding the low-aplitude, low-frequency sine wave as the modulator oscillator.
This far we’ve seen an example of FM (frequency modulation), more specifically using a LFO (low-frequency modulating oscillator) to create a slight vibrato. When the modulating oscillator has an audible frequency and larger amplitude, something else happens: sidebands (other frequencies present around the carrier frequency) are created.
This sidebands’ frequencies depend on the frequencies of the carrier and modulating oscillator: c+m, c-m, c+2m, c-2m, etc (where c stands for carrier and m for modulating oscillator’s frequencies). This relationship represents the ratio of carrier frequency to modulating frequency (Fcar/Fmod) = the harmonicity ratio. The number of sidebands is determined by how strong the modulating oscillator’s amplitude relative to its frequency. The ratio Amod/Fmod = modulation index.
The harmonicity ratio and the modulation index are the main factors in determining the number, placement, and relative strength of the different partials of the resulting sound = the timbre.
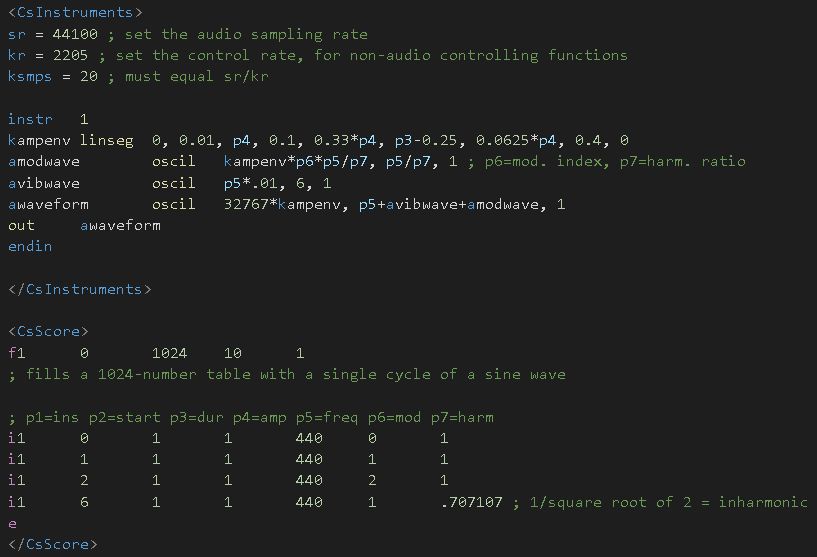
Third step:
- Create a high-frequency modulating oscillator to create sidebands (in addition to the LFO for the vibrato). In order to control the timbre of each note, we specify the modulating index and the harmonicity ratio as separate p-fields in the score file.
- Doing the necessary calculations as described above, obtain the ratios needed for this new modulating oscillator (in the instrument design).
- Harmonicity ratio = Fcar/Fmod => Fmod = Fcar/harmonicity ratio. Fcar is
p5and the harmonicity ratio isp7=> the frequency of the modulating oscillator = p5/p7. - Use an amplitude envelope: the
linseggenerator. This traces a series of line segments between some specified points - in this case the shape of the envelope is made to be directly dependent on the amplitude value given throughp4. The same envelope is used to shape the amplitude of the modulating oscillator: the lounder a sound gets, the more partials is contains (the modulation deviation increases), giving a more realistic timbre.
Although defining frequencies for the notes to be played is alright, it can get quite messy the more complex the score. Luckily, it’s fairly easy to use pitch notations, as CSound has a function called cpspch() to translate pitch to cycles per second. Pitch = actave plus a number of semitones: e.g. A above middle C = middle C plus 9 semitones = cpspch(8.09).
Forth (and last) step:
- Adding a variable
ifreqin the instrument design that will save the carrier frequency based on the pitch notation in the score => replacingp5withifreq.
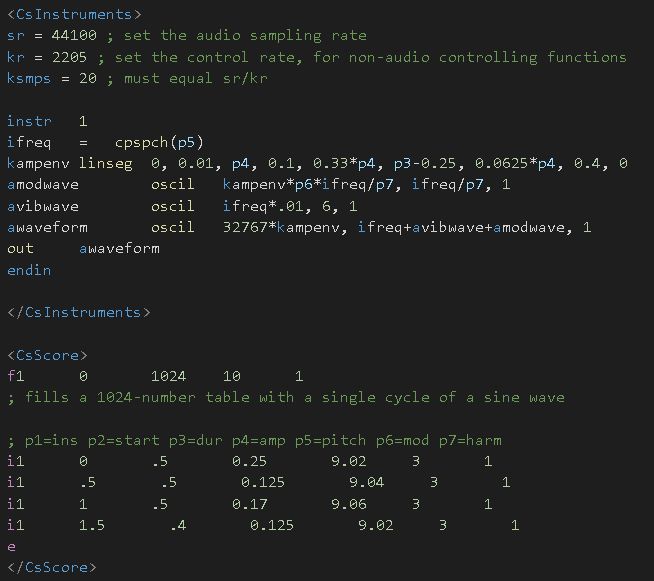
CSound final score and demo
Here is the final CSound program. Using a Tempo and Note Length Calculator I calculated the durations of each note based on a BMP = 51 (Largo). Knowing the frequencies of notes was also useful at different stages of this project.
Here is a demo video of the final “performance” of the first few bars of “Moonlight Sonata” by Beethoven using a slightly peculiar sound - somewhere between a marimba and a vibraphone.
Overall impressions
It was a nice experience to read so much about oscillators and ways to module sound and creating the score was really fun, even if a bit tedious as well.
This assignment helped me understand more about the basis of CSound. Before this, I knew nothing about sound modulation and how we can use the frequency and amplitude of sounds, so even the simple notion of creating an oscillator slightly confused me. I can now say that I familiarized myself with the concept of creating different types of oscillators and I know how to use the “interface” of CSound (e.g. I know how to create an instrument and how to controll it from the score). I even got the chance to use the manual when looking for linseg.
However, for me, the most interesting part was to read the theory behind these techniques, and finally understand (at least a few of) the concepts behind digital audio.
References
Chowning, J. (1973). “The Synthesis of Complex Audio Spectra by Means of Frequency Modulation” (PDF). Journal of the Audio Engineering Society. 21 (7).