'El Camino de los Lamentos': A performance using custom Csound VST Plugins
As part of the project for Digital Audio module regarding MCT4000 course, you will find below a video for a performance that uses an effect and a synthesizer implemented in CSound, which were exported through Cabbage. Besides, I used the looping capabilities of Ableton Live together with a specialized Ableton controller (AKAI APC40), a MIDI keyboard controller (AKAI MPK mini), an electric guitar, and my voice.
I called this song in Spanish “El Camino de los Lamentos” (The Road of Lamentations) considering the mystery and feelings that, personally, they produce in me. I hope you like it. Later, I will explain the work behind the development of these plugins.
The Performance
This performance is a looping session that starts with a pre-recorded drums base, then, it continues with arpeggios from an electric guitar with a reverb given by the custom VST plugin effect with a little pitch scaling amount. The next part is a melody with the same schema, but in this case the pitch scaling is more noticeable because it has less reverb and a little modulation effect that makes a slightly change of pitch in time.
After some guitar playing, I continue with the synthesizer VST plugin by using a square wave. Firstly, a chord base is played with a small value in the cut off frequency of the low pass filter and a high resonance, then I change those values to have more frequencies into that base. Here, the panning effect can be listened slightly.
The next loop track is about a simple melody with a very noticeable moving panning regarding the delay. Here I change some parameters in real-time to demonstrate the effect of changes in the low pass filter and frequency modulation.
Finally, I used the effect over my own voice by scaling the pitch on a fifth (+7) or a complete octave (+12) and sometimes back to normal (0). The performance ends with the same percussion as the beginning and the volume decaying slowly and manually.
Plugins Development
The Synthesizer

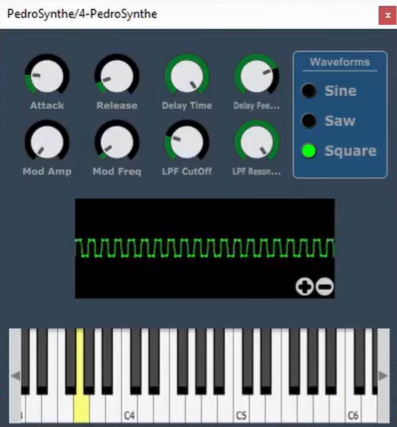
The image above depicts the interface for the synthesizer I implemented. It can be controlled directly with the mouse pointer or through a MIDI controller when used in a DAW and mapped properly. The following elements compose this plugin in two Csound instruments:
Elements of Instrument 1:
-
Waveforms: The user can choose among a Sine, a Sawtooth, or a Square waveform as the sound source. For producing the last two, I used the ftgen opcode to obtain global variables and give them to an oscil as a parameter. It means that those waves are shaped by the sum of sine waves considering the right harmonics to generate them. The UI in Cabbage is a group of radio buttons that allow the user to select just one out of three options.
-
ADSR Envelope: The madsr opcode is used to modulate the amplitude of the wave generated every time a key from a MIDI controller is pressed. Only the attack and release parameters are exposed as knobs, while the decay and sustain are fixed.
-
Frequency Modulation: A sine LFO works as a modulator for the frequency of the source wave and is controlled via two parameters: Mod Amp and Mod Freq, which correspond to the amplitude and frequency of the modulation signal, respectively.
-
Output and Display: The resulting signal is added to a global signal that is processed by instrument 2 as well as displayed in the interface as a waveform plot Time vs Amplitude.
Elements of Instrument 2:
-
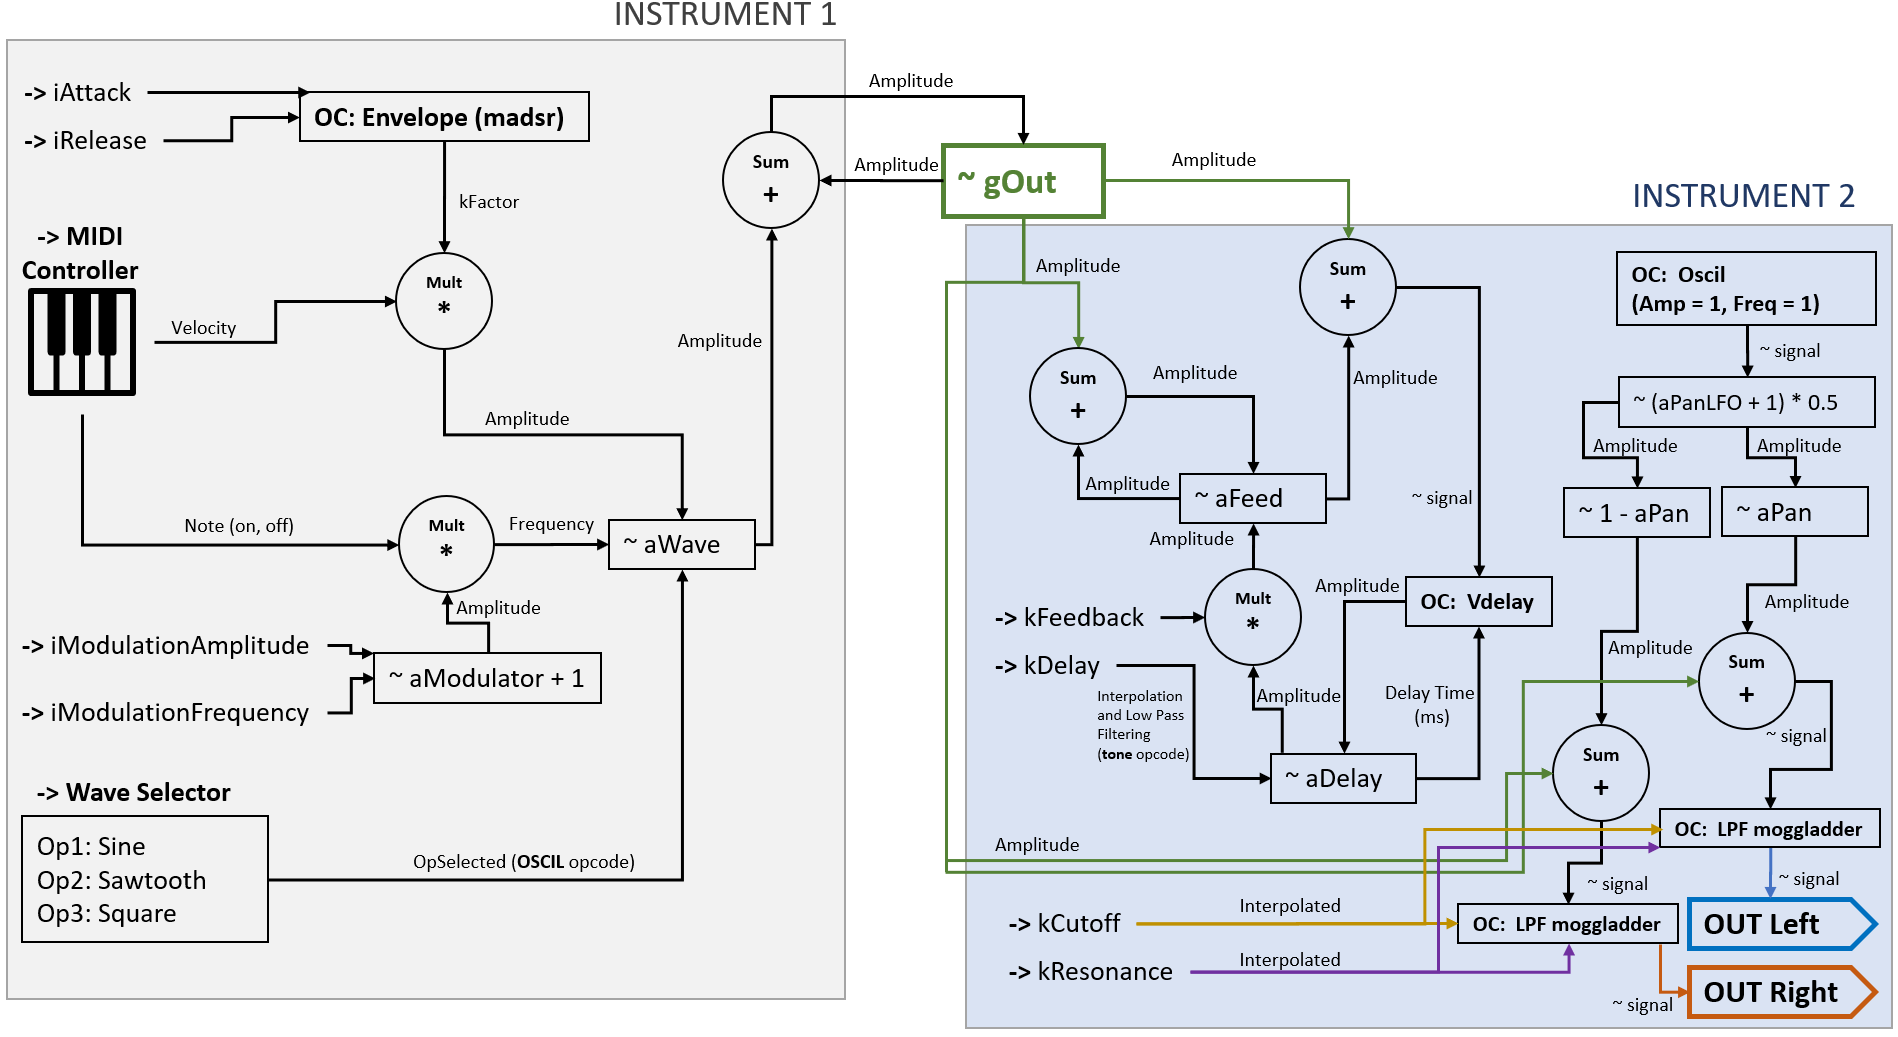
Delay: Here the vdelay opcode is used with an implementation strategy that considers feedback. In this case, instrument 2 is running constantly and parallelly to instrument 1 that is instantiated every time a NoteOn MIDI message is received. Instrument 2 defines a feedback signal that is weighted by the delay feedback amount provided by the user and is built considering the delay time also from a knob.
-
Panning LFO: A sine LFO for panning the delayed signal is used with an amplitude and frequency of 1. This is mathematically manipulated such way the delayed signal is moved between left and right. After this process, a new signal is composed by the sum of the original signal from instrument 1 and the panned delayed signal.
-
Resonant Low Pass Filter: The opcode moogladder is used for filtering the composed signal mentioned before. The cut off frequency and the resonance parameters are given by the user through knobs in the interface. This filtering is applied to both stereo signals and then sent to the output device.
-
Global Output: It is important to keep a global output signal for the delay effect that can be used for both instruments. Also, this signal must be reset to zero after every execution in instrument 2 to receive data from new instances of instrument 1.
The connections architecture for this plugin is shown below. Note that some arrows are colored differently in order to avoid confusion when they are crossed one each other and for the clear identification of the final part in which everything converge to the stereo output device.

The Effect

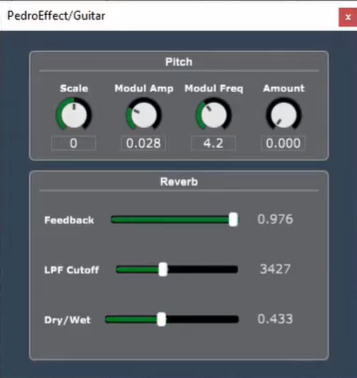
The image above shows the interface for the effect I developed. It is built by using one only Csound instrument and consist of basically two main components that affect an input audio signal: the pitch scaling, and a reverb effect. They are explained as follows:
Pitch Scaling
The idea behind pitch scaling is producing a signal that mimic the input with a different pitch regarding a scale factor. For this case, the scale factor is a number between -12 and 12 which represents semitones below or above the original pitch.
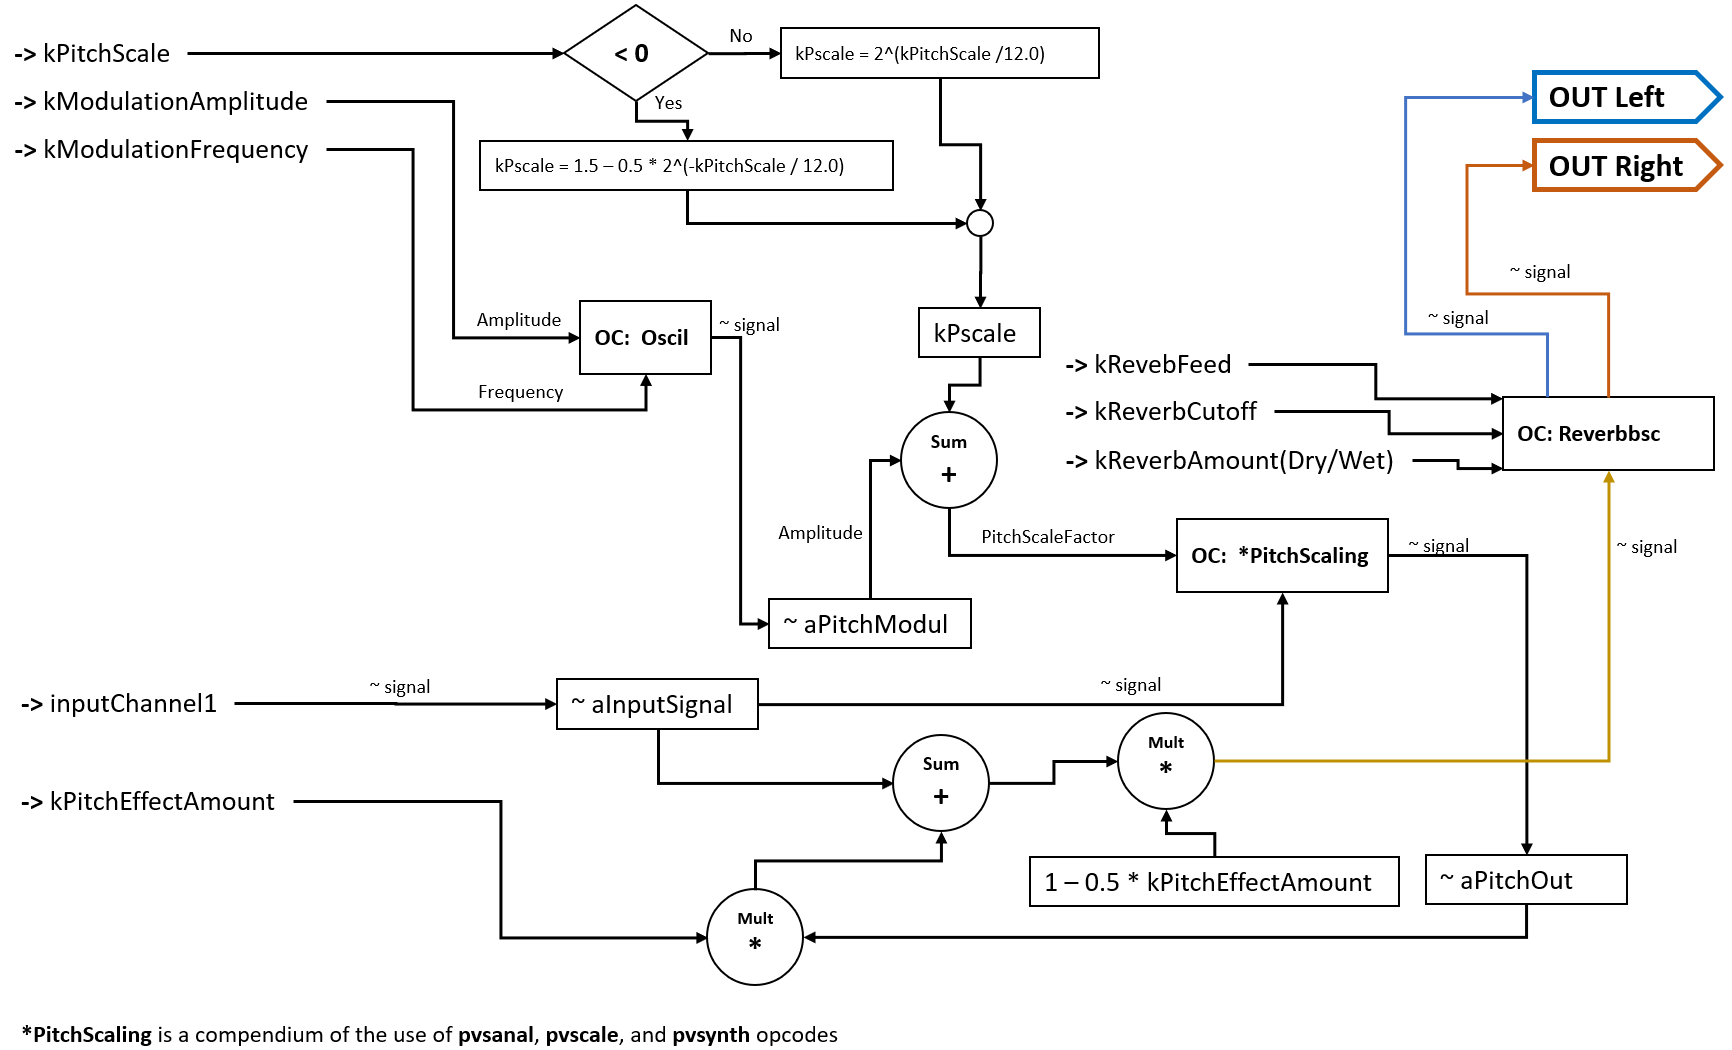
In order to do this, the scale factor (kPscale) is transformed to a different factor. This factor tells us that, when pitch scale is 2, the pitch will be one octave above the original, and when 0.5 an octave below. Numbers in between are given by a formula based on the relative semitone in which the user wants to scale. Thus, for values between -12 and 0, the new scaling factor is 1.5 – 0.5 * 2^(-kPscale/12.0), for the rest of values (0 to 12) is 2^(kPscale/12.0).
After scaling, there is a modulation wave with an amplitude and frequency given by the user that is summed to the result pitch scale factor.
This resulting modulated factor is included in the pvscale opcode that is used together with pvsanal and pvsynth as described here.
After this process, the pitch amount parameter is used to weight the quantity of the signal effect that contributes to the output. Also, a gain scaling is applied to avoid the clipping of the signal.
Reverb
The signal explained in the previous section is sending to the reverbsc opcode. This same signal is used for stereo processing. The feedback and cut off frequency for the low pass filter associated with this reverb opcode are given by the user. The result is the generation of two signals for stereo. These signals are summed with the original signal and weighted according to the Dry/Wet parameter that allows to increase or decrease the presence of the reverb effect in the original signal.
The connections for this plugin are illustrated below. Note that some calculations are computed in one only box to avoid an overwhelming representation for this solution.

Conclusion
The development of a digital instrument or effect is a challenging task because it needs a mental capacity to think in terms of a real-time system, that is, a process that is constantly running in time. This is easier after training your mind about the way of thinking solutions that runs in a loop, and it happens in Csound for audio.
It could be difficult at the beginning to think in this way, but it is important to know the basis of the platform that is being used and explore the tools that it provides in order to build interesting applications.
I tried to implement these plugins as general-purpose components for a performance. Despite they have particular elements, I think they are useful for several compositions. In the case of the synthesizer, various type of waves can be used and shaped in a smooth or harsh way, or even deformed it completely by the frequency modulation feature. The effect also can be regulated according to the needs of the musician, both can be easily modified for live performance or a recording session.
Get the Plugins
You can download these plugins for Windows here. (Copy the two folders in your VST folder). Users from other OS can use the .csd files from the Windows folder and export the plugin in Cabbage
