Reese da Alien!
Technologies Used
- Visual Studio Code
Code editor used to write and compile code. Seems to be ideal for the job, but relatively new. Opinion from from some experienced coders “I use …… - but you shouldn’t, if I started again I would use visual studio code”. It also has a live share function that may prove useful later when collaborating.
- HTML
for the basic user interface (UI), including the buttons, the main picture and the placement of all the UI elements.
- JavaScript (JS)
The bulk of the code and all action and sound based commands are run through JavaScript. This includes the creation of oscillators, and routing the audio signal (which is how the delay functionality is created). Also mapping of all controls – buttons, mouse and keyboard.
- CSS
Used on the last day to add some beatification to the basic HTML. Was used for the “Reese da Alien” title and main background colour. A slider from the nexus library was also added.
- Github
Used for sharing code, and where the repositories of this blog and the code will be stored and shared.
Timeline
- Day 1
Got accustomed to JavaScript and basic HTML. Created two oscillators in visual studio code. Experimented with the provided code.
- Day 2
Added functionality to the mouse movement, and set it up to affect one oscillators pitch and another’s volume. Gave the project the name “Reese da Alien” and found the background image. Experimented with audio FX with little result due to inexperience of routing.
- Day 3
After slow progress during the day, managed to organise the variables and routing on the code. Through routing added a delay effect to the oscillator mix (OSCMix). Created a player looping an audio sample – routed to the output running parallel to the MainMix. Added a third oscillator as FM. Mapped the keyboard with hotkeys.js
- Day 4
Added mouse functionality to the FM oscillator, and remapped the keyboard to use all of the lettered keys. Used CSS to improve visuals, and tweaked audio mapping variables and UI elements to get ready for the final presentation.
The Project & Code
On day 3 when asking for help with my project I was told to possibly start from scratch – and pay attention to the routing and organisation of the signal flow. This helped me immensely. Although I didn’t start from scratch (í was determined to find the problem in the code) the one point that I started to feel more comfortable coding was when I took control of the routing. One of the challenges I faced was that in the first couple of days in the workshop I was trying to achieve results by copying and pasting various examples of code – with mixed or no results. This technique of trial and error in the end helped me formulate my idea, and it was satisfying eventually (although stressful before!) once I worked out how to organise the routing of nodes properly. The original routing was simple like this:
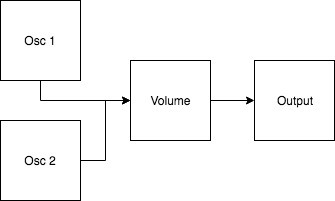
The aspect that I was confused about was the volume node. With experience in using DAW’s, I didn’t take volume to be a node, rather as a parameter that is attached to in this case, the oscillators. It is a small difference – but not knowing that it was a node in its own right confused me when I tried to expand on the project. The flow diagram of the project currently looks like this:
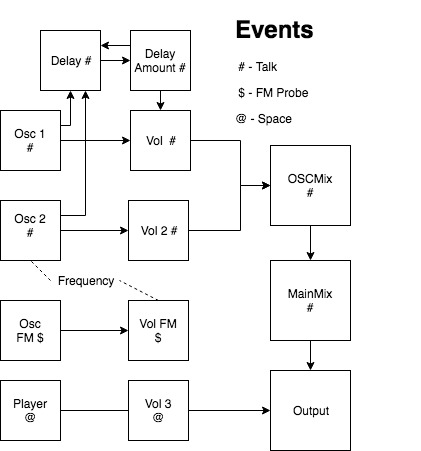
Event - Talk Button
Most of the functionality of this project is located in this event – as can be seen from the flow diagram it includes the first two oscillators, the delay and most of the routing.
The first action I took was to split the routing of the oscillators to various volume nodes (volume, volume 2, volume 3 and volume FM) so they are distinguishable from each other, and can be routed and affected differently if need be. I then combined the oscillator 1 & 2 volume nodes into OSCMix, which was then routed to MainMix into the context.destination or output. Although there is little reason to do this amount of volume nodes for the project in its current state, I wanted to have options for routing if needed – and it helped me visualise the signal flow.
//oscillator.connect(volume);
    oscillator2.connect(volume2);

    volume.connect(OscMix);
    volume2.connect(OscMix);

    OscMix.connect(MainMix);
    MainMix.connect(context.destination);
Delay
The delay was used as an example in class, and I have lifted most of the code from there. It is created using just JavaScript and routing. The delay is only affecting one volume node, and is short time at 0.1 sec and at half intensity of 0.5. This combination I found to soften the sound as well as adding some richness – without sacrificing all of the harshness.
// create a delay effect node
    delay = context.createDelay();
    delay.delayTime.value = 0.1; // lenght of the delay

     // create a gain effect node
    delayAmount = context.createGain();
    delayAmount.gain.value = 0.5; // amount of the effect


 // connect the different nodes
    oscillator.connect(delay);
    oscillator2.connect(delay);
    delay.connect(delayAmount);
    delayAmount.connect(volume);
    delayAmount.connect(delay);
Event - FM Probe (Fm Oscillator)
One of the aspects of this project I am proudest of is the addition of the FM Probe event that routes the third oscillator to the OSC2 frequency. This is done with the line:
//volumeFM.connect(oscillator2.frequency);
Firstly, the OSC FM is routed to VolumeFM – then that is routed to the frequency of OSC2. This was because the first oscillators frequency was already mapped to the mouse movement, so now there would be ability to affect the pitch of both oscillators. This worked in conjunction with the mouse mapping:
    if (playing == 1) {
      //oscillator.frequency.value = x;
      oscillator.frequency.value = widthnor*1000;
      volume2.gain.value = 1 - heightnor;
      oscilatorFM.frequency.value = heightnor*1000;
This shows the three mappings to the mouse. Osc1 pitch is affected by the x – axis. Osc2 volume (volume 2) is affected by the Y – axis. Lastly the OSC FM frequency is adjusted by the Y axis. The aim was to create an increasingly complex sound as the mouse moves around.
Event - Space (Audio Player)
This is an audio player that runs alongside the main patch, routed through volume 3 to the output. Although one of the undeveloped parts of the code, it allowed some creativity in adding recorded sound, and can be experimented further at a later date (a beat possibly?) It was adapted from the code given in MCT repository.
    player = context.createBufferSource();
    player.loop = true;

    volume3 = context.createGain();
    volume3.gain.value = 1;

    player.connect(volume3);
    volume3.connect(context.destination);

    loadSound("alien.mp3");
Keyboard Mapping
I found an online library called hotkeys.js that allowed me to map my keyboard. Found on Github. I declared which keys to use (list after the yellow “hotkeys”), and then below created a large list mapping each character key to frequency of OSC2. I used a webpage (link at bottom) as a reference to frequencies of notes, and mapped just over two octaves (not in a piano roll formation). This allowed for another way to affect the pitch of the patch – adding depth to the playability. I found when used it overrode the mouse mapping of the volume. Not intentional or wanted, however I found when the mouse was off the screen this was reset – which could be used as a feature when played. I would prefer if there was a more elegant way of harnessing both these controls at the same time, an aspect to improve in the future.
UI Elements - HTML & CSS
I wanted one centred, background image. I found this code online to centre the image using HTML, and found the alien picture I wanted and applied it in code, and the jpg same folder:
    body, html {
      height: 100%;
      margin: 0;
    }

    .bg {
      /* The image used */
      background-image: url("alienwareplus.jpg");

      /* Full height */
      height: 100%;

      /* Center and scale the image nicely */
      background-position: center;
      background-repeat: no-repeat;
      background-size: cover;
CSS & Beautification
CSS was used for the title in the bottom right corner, separated in a CSS file. This code defined the font, border and colour, as well as the positioning permanently in the bottom right.
position: fixed;
bottom: 0;
right: 0;
width: 300px;
border: 3px solid #73AD21;
The same technique is applied to the text, and the fader that went unused. The fader came from the nexus.js library, I was able to implement the fader, but not attach it to any command as of yet.
Other tips I have learned throughout the workshop – organisation is key. Having events on the leftmost lane, and having its contents further tabbed on the right helped a lot in understanding the code, and made it easier on the eye at a glance. Writing notes and toggling line comment was picked up on the second day – but vital for any beginner.
Future Development
There are many ideas and avenues I feel this project could go down. I would like some more feedback on the project, but for now I have some thoughts on the directions it could go.
One of the issues of the patch is that not all areas of the screen sound “good”. This was alleviated by the inclusion of a delay – but I believe more FX could be added to sweeten the corners especially. These FX ideally would be sensitive to mouse placement, and programed in a way so that they would be applied only with the mouse on a certain part of the page. I installed Tuna.js for more FX, but did not manage to get it implemented in the code and ran out of time to troubleshoot.
During day 3 I spent some time trying to implement canvas.js, after being inspired by another project. I managed to create a box, but quickly realised if I wanted the sound to be the focus it was a little out of my depth or timescale for the project. The idea was to create more interactivity in regards to the synth, more of a hybrid from the X/Y axis that the mouse mapping produced. Although I didn’t manage any meaningful results, I would like to explore this further. I would like the page to work well in a smart phone environment, and a canvas feature would aid in this I feel.
Talking of visual components, having the alien pull various facial expressions during certain moments would be a nice touch, giving more character to the potential app. As I mentioned I would like the program to be smart phone friendly (have no experience in how that is implemented, but the concept) – using a finger rather than a mouse may be preferable for the final product.
If anyone would like to use or view the projects code it will be located at this repository for reference:
https://github.com/cheeserage/ReeseAlien/tree/master/ReeseAlien
Sources used below -
Note Frequencies
http://pages.mtu.edu/~suits/notefreqs.html
MCT Github
https://github.com/axambo/sound-programming-workshop/
Canvas.js
Nexus.js
https://github.com/nexus-js/ui
Hotkeys.js