The Wavesynth
During the first workshop week in the course Audio Programming, I have been working on a project which I have called “The Wavesynth”. I have called it this because I have chosen to use wavetables to shape the output of an oscillator. I have not made a wavetable synthesizer like for instance Ableton’s Wavetable, where you can interpolate between waves. instead I use some wavetables created by Google Chrome Labs to make it sound like “real” instruments. The synth is played by using the computer keyboard, and the user can choose the output sound, and adjust three different effects to shape it the way they want. The synthesizer is made using web technologies, including HTML, JavaScript, Web Audio API, and more.
Keywords: Web Audio API, JavaScript, HTML5 Canvas, Wavetable, Synthesizer, DSP, NexusUI
Early process
Luckily for me I have experience working with javaScript and the Web Audio API. This meant that I could use my previous knowledge to help others that were new to the field of programming and digital signal processing. Helping others also helped myself refresh my knowledge, which have been laying in the back of my head for some time. It’s crazy how quickly one can forget!
During class we went through the basics of HTML, javaScript and the Web Audio API, some of the web technologies required to create a website and to be able to control audio on the web. I quickly decided that my project should be a keyboard-controlled “sound generator”. With that in mind, I created a piano keyboard layout, where I made computer keyboard presses correspond to each note.
The keyboard
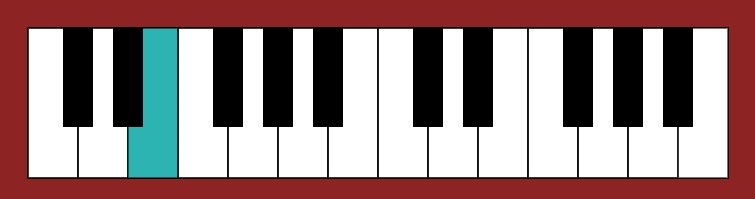
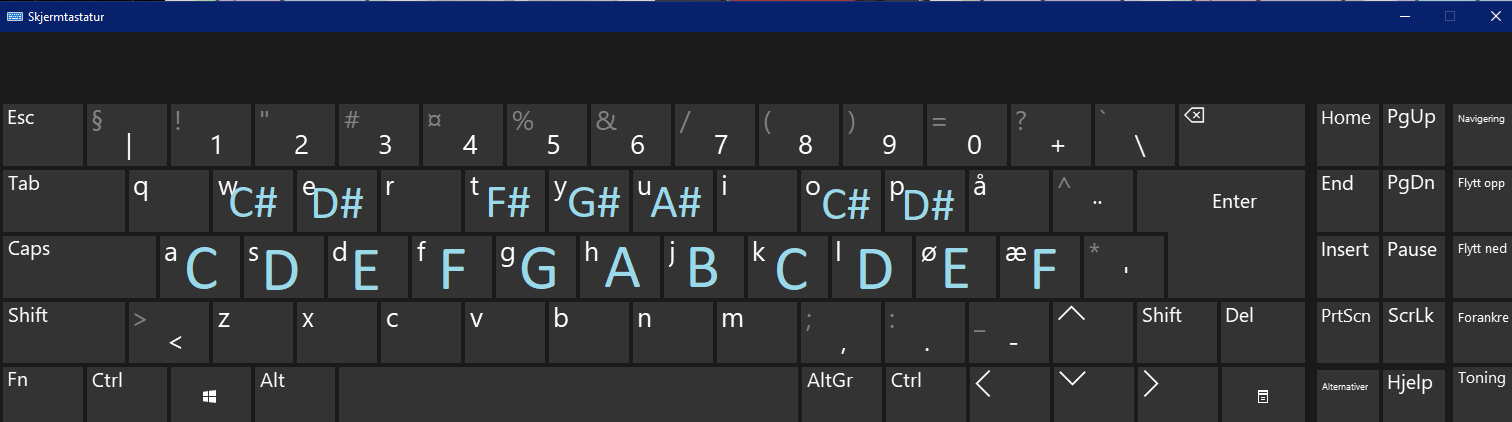
Above you can see images of how the computer keyboard is mapped to the piano keys.
The piano keys are created using HTML5 Canvas, a way of creating graphics on the web using javaScript. Two canvas elements area created in the html file, one for drawing the white keys on, and the other for drawing the black keys on. The actual drawings are programmed in javaScript, and the canvases are redrawn for every time a key is pressed, with the corresponding key turning blue.
Where is the sound?
After a day without making any sounds, only working with on making the keyboard and the key triggering logic, I felt I had to start producing sounds. Day 2 was on, and I wanted the synthesizer to be polyphonic. I wrote, tested, edited, tested, looked for examples, copied examples, edited, tested, and so on. It did not work, and stress came along…
Two hours maximum of coding after the seminars was not enough for my brain to come up with a solution, so I put the idea of making it polyphonic on the top shelf. It will be taken down later.
Mid process
I had decided to go over to a monophonic synth, and during day 3 it was working. for every time I pressed a key, I created a new oscillator, passing the frequency as an argument, and for every release of the key, I stopped the oscillator. I wrote logic code to prevent multiple triggering when holding down keys and used envelopes to prevent “click” noise when stopping sounds.
At the end of day 3 I got the custom wavetable to work. I was originally most interested in getting a Wurlitzer sound, and at Google Chrome Labs’s Github page I got a wavetable for this. I copied the raw file, and made a JSON (JavaScript Object Notation)-file out of it. JSON is a syntax made for storing and exchanging text-data. In javaScript I can then get the json-file using a XMLHttpRequest object and convert it to a javaScript object using the built-in function JSON.parse(). I then made a function to set the wavetable to the oscillator, which you can see in the script.js file in the repository, which I’ve linked to at the bottom of the blog post.
Late stage
Day 4 had come, and I had not gotten as far as I had hoped. Maybe I prioritized wrong; beginning with the keyboard layout, helping others, and getting in over my head in complexity, but I ended up with an ok result.
I used the last hours to implement a lowpass filter into the signal chain, which the user could change using a slider. The slider was made with a library shown to us by our teacher Anna Xambó, called NexusUI. “NexusUI is a collection of HTML5 interfaces and javaScript helper functions to assist with building web audio instruments in the browser.” (https://nexus-js.github.io/ui/). This is a very nice and easy to implement library that makes it relatively easy to build a good-looking web interface.
The weekend
Not being so happy with the result, I decided to use some of my weekend on cleaning up my spaghetti code, optimizing it, and implementing some new functionality. First, I went away from making a new oscillator with every keypress, to connecting and disconnecting it from the output (destination). When working with the functionality of the filter and a newly added delay effect, I encountered some logic errors with the signal chain. I then decided to instead turn the oscillator on and off by setting the gain to 0.5 and 0 respectively.
The effects
I ended up with three effects. A lowpass-filter with adjustable cut-off, a delay with adjustable delay time, and a tremolo effect with adjustable tremolo speed. The user can activate and deactivate these effects with a corresponding button and use sliders to adjust the effects.

More waves, octaves, and optimization
As you can see in the picture above, I also added a dropdown where you can choose between different instruments! I added this by retrieving more wavetables from Google Chrome Labs, making several json-files, and running a XMLHttpRequest every time the user chooses an option from the list, and then updating the wave of the oscillator. In addition, you can also choose which octave you want to play in. This is quite useful, since the keyboard has a limited number of keys in a row.
I chose to start the audio context, create every node, connect every audio node, and set a default configuration with one big button. This button initiates all this, and the code runs only on the first press. The synthesizer will not work before you press the big button.
Lastly, I have worked a bit with CSS to make it look alright.
Valuable learning and future work
Even though I have previous experience as mentioned, I have learnt a lot during this week. I was more than a bit rusty on the syntax, the routing and the Web Audio API functionalities. This workshop has definitely helped me grasp these concepts more clearly.
I will continue to explore the libraries we have been shown, which I believe will make life a lot easier :smiley: I want to continue to work on how I have routed the effects, adding user ability to change dry/wet ratio, and I want to add reverb. I may choose to use some libraries in the future for faster building, but still I see the absolute need for having the foundation of how to do DSP with only the Web Audio API. One last important thing is that I need to make it responsive. For now, the GUI (Graphical User Interface) is not scalable, so it would work poorly on a small device.
If you want to see how I have built my application, look at my repository! I have tried to comment the most important lines of code and divided it into sections for easy reading.
Want to try it? Try it here