A short post about feedback
This tutorial is going to be about feedback - we will be looking at what feedback is, why it happens and what we can do about it.
What is feedback
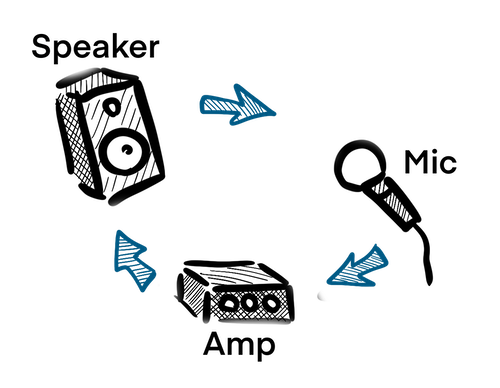
Acoustic feedback is that delightful squeal we are all familiar with that happens when we turn things up just a little too much. It is when a microphone picks up sound from a loudspeaker and sends it back to the amplifier to be reamplified. If the gain is greater than the acoustical loss, the signal continues to build up and the system starts to act as an oscillator.

Even if the gain isn’t quite high enough for the system to go into self oscillation, feedback can still result in unpleasant ringing tones during speech due to long delay times at particular frequencies.
Of course, anyone that has listened to Sonic Youth knows that feedback can be your friend, but it tends to be less welcome when working on telematic performances or otherwise collaborating in the portal.
There are several elements that can contribute towards unwanted feedback in a system, including the types of microphones used, where they are placed in the room, the rooms shape and size and last but certainly not least, the volume you are trying to achieve.
We will start by looking at microphones, and what role they play.
Microphones
A microphone is a transducer that changes one form of energy - sound waves - into another - electrical signals.
The directionality of a microphone refers to its ability to record from various directions.
Unidirectional microphones will record sounds from a single direction, bidirectional from 2 opposite directions, and omnidirectional records from all directions with equal sensitivity.
Most microphones are unidirectional, and use what’s called the cardioid pattern. This is a heart shaped pattern (hence its name) that allows the microphone to record everything in front of it (and a little to the sides), while rejecting sound that comes from behind.
Other patterns include:
- Supercardioid, hypercardioid
- these offer a narrower front pickup angle than a standard cardioid, with the hyper cardioid offering the narrowest. block more of the sides out, but can let a little of the behind signal in. Good for noisy environments. The AKG podium mic is an example of a supercardioid.
- Figure of eight
- A bi-directional pattern that records from the front and back, and rejects sound from the side.
Some microphones offer the ability to switch between different patterns, in order to change their directionality. The AKG ceiling microphone we have in the portal is an example of a multi-pattern microphone.
When dealing with feedback, a more directional microphone is preferred - the cardioid and super-cardioid patterns tend to work the best here.
Microphone placement
When it comes to microphone placement, as near to the source, and as far away from the speakers as possible is the general rule here.
For situations like meetings and classes in the Portal, the ideal would be individual, mute-able mics for each participant, although of course that isn’t most convenient. Ceiling mics are certainly more convenient in this regard, and can often work well, provided the microphones are facing away from the speakers.
Speaker placement is also important. It seems obvious to keep the microphones out of the direct line of a loudspeaker, but speaker dispersion angles can vary, and the sound can end up bouncing off walls back into the microphones. This brings us to the properties of the room itself, so it’s time to dip into the loveliness that is room acoustics.
Room acoustics
Every room has a particular acoustic profile. This is a fancy way of saying that sound bounces off the walls in different ways, depending on a number of factors, including
- the size and shape of the room
- the materials the sound is bouncing off - so a metal box is going to have a different profile to a lushly carpeted and curtained living room for example.
Feedback tends to occur at the frequencies of prominent room resonances - in order words, at the peaks in the reverberant sound field. If a room has a natural tendency to resonate at 800hz for example, we will find the frequency of any feedback will correspond with this resonant frequency. These frequency peaks are called the room modes. For more of a deep dive into the theory behind room modes, check out Lindsays tutorial - he goes into all the gory details.
Another important aspect of a rooms response is the delay time of reverberant sound. The combination of the frequency peaks - the modes - and a long delay time can result in modal ringing - one of the types of feedback we are wanting to eliminate.
When it comes to room acoustics, the good news is that the situation is very often treatable. Two approaches are generally taken here - the first is to treat the room so that the peaks are reduced. This can be done with bass traps in the corners, mid/high frequency absorbers on the side walls, and diffusers to spread and scatter the sound waves. The second is by using equalisation, which I will talk more about in the next section.
The portal
So how can we apply all this newly acquired knowledge to our dear portal, I hear you ask?
Well, let’s start by taking a look at the size and shape of the portal, and see what we can gleam from this.
These are the various attributes of the room
- Height: 2.932
- Width: 5.003
- Length: 10.410
- Volume: 152.51 m3
- Surface: 194.4 m2
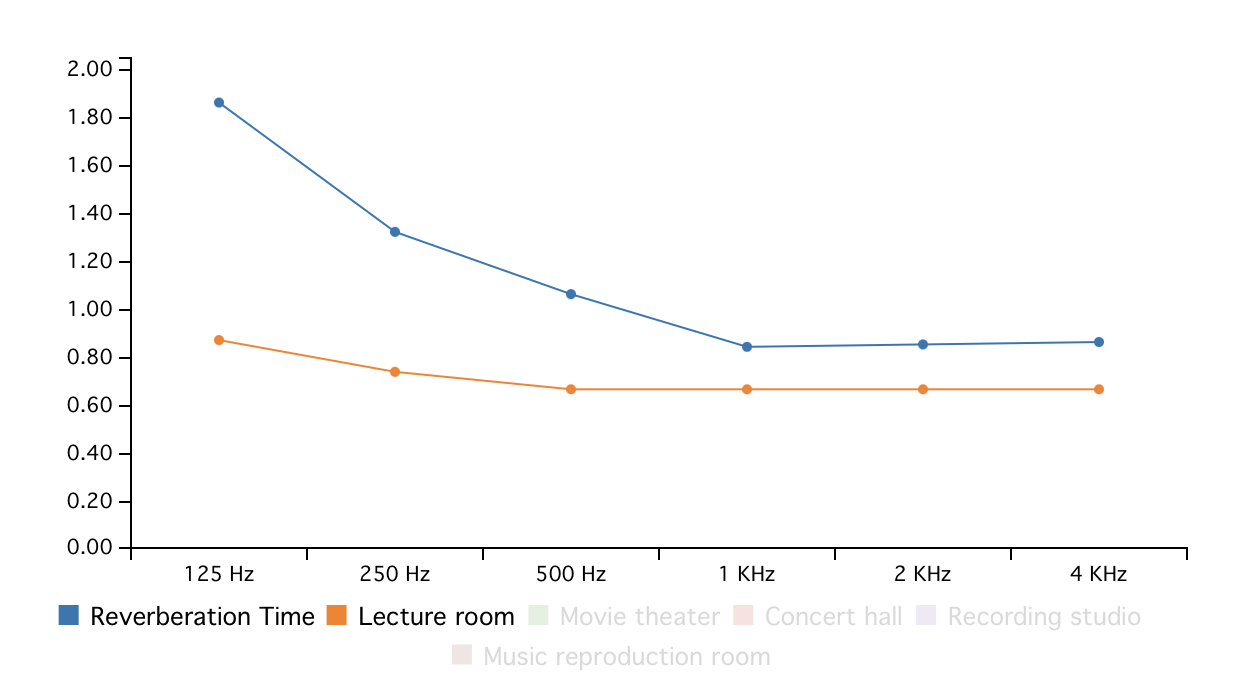
Using these measurements (and a handy website that does all the work for us), we can calculate the reverberation time. A useful measure of reverberation time is called the RT60 value, which is the time in seconds it takes for a sound to decrease by 60dB. The recommended RT60 value for a meeting or lecture room is 0.6 seconds. As you can see, the portal could use some room treatment - especially in the low end - to get there, but it’s not too far off.

Lets now look at the microphones.
We have 3 microphones mounted on the ceiling in the portal
- two DPA 2011 twin diaphragm cardioid microphones
- a single AKG C414 XLS condenser microphone
We also have a single podium microphone for the main speaker - an AKG CK80, a hyper-cardioid shotgun condenser.
I carried out a process called ringing out the room to find which pesky frequencies are causing our feedback issues. This process involves putting in earplugs, and turning up the volume of each microphone until feedback starts to occur. Then I used the RTA display on the Midas mixer to identify the frequency of the feedback. I would then use equalisation to narrowly cut that frequency, and then repeat the process.
This helped me identify 3 frequencies that were causing issues.
- 3 kHz
- 1.5 kHz
- 800 Hz
Interestingly, while the podium microphone was very easy to drive into feedback, I struggled getting any feedback from the ceiling microphones. And after cutting the 3 frequencies identified above, I struggled to get even the podium microphone to feedback. So that worked!
Summary and general tips
So what are a few takeaways from this if you are struggling with feedback in your own space?
- Choose a suitable microphone - this means a more directional microphone like a carioid that will pick up most of its signal from the front, and reject sound coming from behind.
- Place the microphones as near to the source as possible, and out of the path of the loudspeakers.
- Find out how your room behaves. Take some simple measurements, find out whether some room treatment could help tame things.
- Ring out your room. Pop in those earplugs, turn up the volume and find out exactly which frequencies are causing the problems.
I hope this tutorial has been helpful, and that you now have a better understanding of how feedback works, and how we can begin to tame it.
