Cross the Streams
For the final musical presentation of the portal subject for this semester I was responsible for streaming the audio and video to the MCT YouTube channel. There were many different ways of doing this so I’ll highlight the considerations and decisions for going with the setup we finally used.
Overall considerations
When designing this system I wanted to use as few different systems as possible to minimise the amount of things that could fail, especially considering this was my first time using most of the hardware and was not familiar with how reliable any of them were.
Streaming software
The go-to for free streaming software is OBS. It’s open source and I was already familier with the slightly more user friendly version OBS Streamlabs from some personal experience live-streaming video games, so this setup was relatively easy for me. What was different in this situation was that all the video transitions would be handled using an external hardware device so we would only have one “performance” scene in OBS.
Video
As mentioned in the above section, the video transitions were handled using the hardware device Atem Mini by Black Magic Design. The other option was to use the Black Magic web presenter, but the model we have is old and only supports 720p so we decided against it.
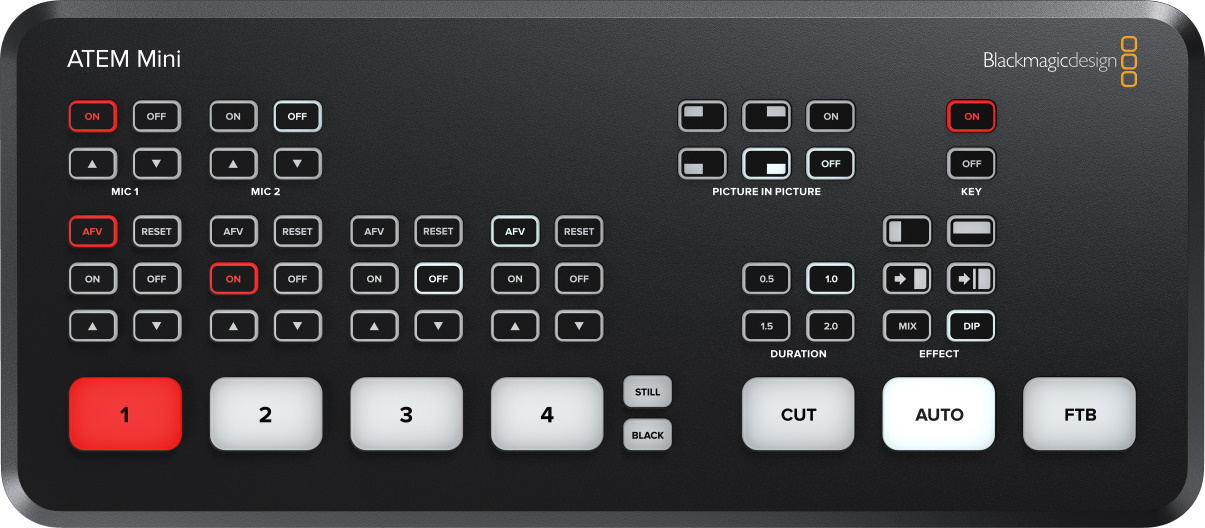
When all video feeds are sent directly to the streaming PC it is easy to create one scene per video source and then in OBS’s studio mode, preview which scene you will be transitioning to. Handling all the streams directly on the PC would require a hardware device capable of handling multiple streams or a capture device per stream, resulting in many hardware devices and lots of load on the cpu/gpu of the machine handling the streams. Instead this processing is offloaded to the ATEM mini but the ATEM only outputs the final livestream over the USB/webcam. In order to preview the scenes we were transitioning to, a second monitor was set up connected to the HDMI output of the ATEM and using the ATEM’s setup software we were able to configure the HDMI to output the “cued” scene to the HDMI while sending the live output over USB.
For the cameras, I put in a SDI to HDMI adapter on our PTZ camera and fed the HDMI to the Atem Mini. I did the same for the TICO feed from NTNU but also fed the pass-through SDI to the front screen so our performers could still see NTNU performing. NTNU relied on our Zoom video because I didn’t pass through our feed to TICO from the SDI-HDMI box (due to lack of cables). We added a second camera at UiO that was fed into the ATEM mini through another SDI-HDMI converter and this camera was used for close ups.
Sound
There were a few options for the audio as well.
- Send the audio from the mixer to the Atem Audio input using a mini jack
- Send the audio from the mixer to the Streaming PC’s onboard soundcard using a mini jack (which is already set up)
- Get the audio stream from the mixer to the Streaming PC using the mixer as a USB soundcard

I decided to go with the third option because I didn’t want to rely on the onboard soundcard of the streaming PC. I preferred not to use mini jack on the ATEM for the audio stream as well as it introduced an unnecessary piece of hardware for the audio to go through when I could just get the audio stream directly from the mixer via its usb interface. The way to configure the soundcard was not exactly intuitive (which I think can be said for a lot of the Midas settings) but in the end we had to configure it as a 2 channel in/2 channel out soundcard. Initially during rehearsals we mapped the Main Out L/R to the USB interface, but then the level of the stream was tied to the level of the audio output in the UiO room, which we had to turn down to avoid feedback (or may have been completely muted if we decided to go with headphones instead) so in the end the Monitor L/R was mapped to the USB interface. This was done by assigning a “User” route bank to the Card device on the Midas 32 and setting channel 1 and 2 of the user bank to Monitor L/R.
On the day
On the day we had some issues with the streaming PC. It was decided to delay the performance for covid reasons, so a scene was created and broadcast 2 hours prior to the performance informing viewers that the live-stream was being delayed. The streaming PC was not particularly powerful and I’m not sure of the exact reason, but after two hours of this pre-stream the machine was running at 100% cpu and was not sending any stream data YouTube. After terminating the stream and restarting, we were still experiencing large frame drops at 1080p and in the end I had to drop down to 720p. I’m not sure whether the UiO internet was under high load at this time but I think UiO has more than enough capacity that our 1080p livestream should not have been impacted by that though.
Final Thoughts
Play it safe
We were aware that the streaming PC was not very good hardware wise, but it is not easy to get a new machine provisioned and set up on the UiO network so we had to use this machine. With this knowledge I should have gone with a 720p stream from the beginning, as even though the initial test stream we did was okay at 1080p most of the time, there were periods of 100% cpu usage.
Do a dress rehearsal
Whilst we did test that live-streaming worked during class, we never did a full “dress rehearsal”, it was more similar to a sound check or tech rehearsal. Having a background in theatre and/or music I think most of us were familiar with having a full dress rehearsal before a performance but felt the time pressure of this particular performance and were more focused on making sure our individual tasks, eg. sound, video, presenting were organised.
Don’t change things on the day
During one of the performances I wanted to focus on a musician standing at the mixer and remembered I had set up an OBS scene for that during rehearsal but it wasn’t there anymore. I recreated the scene on the fly and then transitioned to it a few times during the performance. Depending on the setup, this could have been fine, but unfortunately I had added the main audio input to the primary performance scene and not the general project, so when I cut to the new scene I had created, the audio cut out. In this case it would have been better to play it safe.
Monitor the stream
I had headphones connected to the streaming PC but I wasn’t wearing them during the live performance which is a pretty obvious mistake. This would have immediately made apparent the problem highlighted above where I changed to a scene but there was not audio.
Have another channel for communication
We had not established a way to communicate between UiO and NTNU off-stream (not using LOLA) so when we were live we have no way of communicating with NTNU without it being broadcast to the viewers. In the few instances where we needed to contact NTNU, for example to establish a better camera angle, we posted on our discord channel, but we had not informed them to check this (to my knowledge) so it was just lucky that someone checked it and made the corrections.
Take a look
If you’d like to see the performance you can watch it on YouTube below.