CordChord - controlling a digital string instrument with distance sensing and machine learning

Introducing CordChord
CordChord (cord as in string, chord as in two or more notes played together) is a two-voice digital string instrument that is part harp and part cello, and is built using the Bela platform. In order to understand the behaviour of two strings that neither vibrate nor have acoustic amplification, I made use of an intriguing methodology for string for tracking the movement of and pressure exerted through violin bows. Read on to learn how CordChord works and some of my reflections on the project.
Designing the Frame
Like many of the finest string instruments from the likes of Stradivarius, CordChord is constructed out of maple and spruce wood for old-growth forests (discarded IKEA bed slats I found in a skip last winter) that I assembled with an all-natural glue (nailed together into long rectangle). I then fixed the two ‘strings’ (lengths of polyester rope) between the short ends of the structure using fine pegs of ebony wood (metal hooks from Clas Ohlson).
Determining the Positions of the Strings Using Sensors
Most musicians have a fairly accurate mental model of how an acoustic string instrument works. By changing the effective length of the string by stopping it using our fingers, the string vibrates at a different frequency when plucked, hit, or bowed. However, unlike the guitar, cello, or violin, the performer of CordChord does not vibrate the strings at all, and there is no ‘body’ which acts as a resonating chamber to amplify these vibrations.
Instead, I needed to find a way of interpreting the behaviour of the strings using sensors. An approach previously used for tracking the motion of and pressure exerted through violin bows came to my rescue. In 2013, Pardue et al. proposed a method for bow tracking using optical distance sensors.
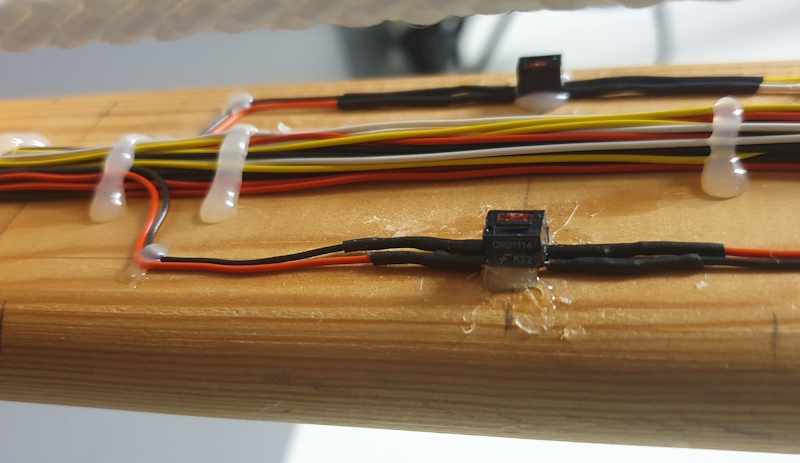
These sensors are essentially two components in one housing: an infrared (IR) LED and an IR photoresistor/light-dependent resistor. The basic concept is this: the IR LED emits infrared light, which then hits and is reflected by a reflective object or surface. For an object directly infront of the sensor housing, this light will be reflected directly back towards the IR photoresistor. The closer the reflective surface is to the sensor, the more of the IR light that makes it back to the photoresistor. As a result, we can interpret the reading we get from the photoresistor as correlating to the distance between the reflective object and the sensor itself.
But how does this apply to tracking violin bows? Pardue et al. place four of these distance sensors under the bow stick facing towards the bow hair. As the bow is pressed down into the string, the bow hair deflects around the contact point by an amount which correlates to the downward force applied through the bow. As the hair deflects, the distance between the stick and the hair changes. By measuring this change at the points where the sensors are mounted, we can determine where the string contacted the bow and how much the hair moved. In fact, every combination of contact point and pressure results in a unique set of readings from the sensors.
I decided to repurpose this approach to determine the position of the strings in CordChord. Attached to the vertical neck plank, which is equivalent to the bow stick in this analogy, are four distance sensors per string, pointed towards the string. As the strings (equivalent to the bow hair) are reflective to IR light, pulling a string towards the neck changes the readings from the sensors pointed towards it.
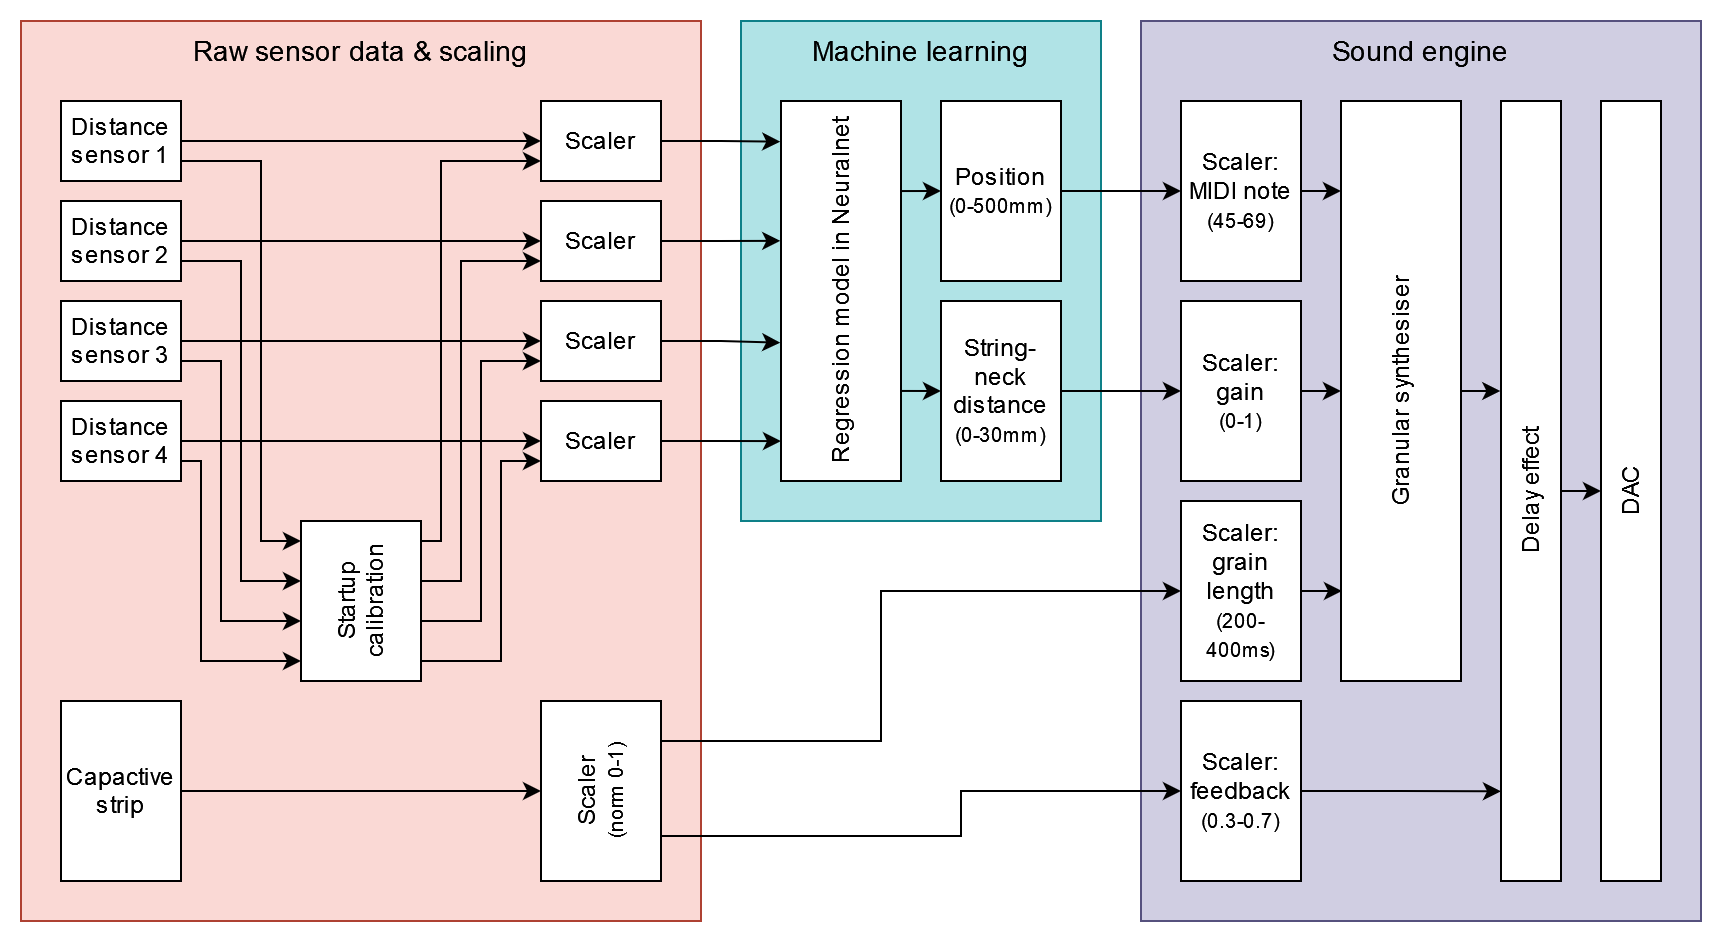
I then trained a simple regression machine learning (ML) model using the Neuralnet external for Pure Data which, given the values received from the sensors pointed at each string, is able to predict the position along the neck at which the string is pressed (equivalent to the contact point in the bow example), and by how much it is displaced at that position (equivalent to the pressure). This position and displacement are then mapped to pitch and volume respectively; pressing the string low on the neck will result in low pitches and vice versa, while pulling the string only slightly will create a softer sound than pulling it all the way towards the neck.
Controlling Timbre with Capacitive Sensing

I settled on capacitive sensing to control the timbre of the sound engine. The performer can place their thumbs on two copper strips on the back of the neck, which increases the capacitance in the circuit. Different thumb positions result in different amounts of contact between the skin and the copper strips, which we can read in software as a number. This number is mapped to grain length of the granular synthesiser and a delay feedback parameter such that not touching the strips at all will result in a ‘grainy’ sound with little of the delay effect, whereas touching lots of skin to the strips will create a much more sustained sound with a noticable delay effect.
Sound Engine
The sound engine for CordChord is a two-voice (one per string) granular synthesiser which chops up a sample of a cello sustaining a single pitch. This sample is sped up or slowed down to create the pitch, which is determined by position of the performer’s finger that is pressing the string. As mentioned above, the grain length, or the length of each tiny ‘grain’ of sound that is taken from the original sample, is controlled by touching the capacitive copper strips on the back of the neck. Longer grain length results in more overlap between consecutive grains, in turn resulting in a richer timbre and a more sustained tone.
Reflections & Future Improvements
CordChord works well as a prototype. However, as with any prototype, there are a myriad of small issues and areas for improvement.
Two primary issues is the relationship between the dimensions of the frame and the range of the distance sensors. The distance sensors I used have a working sensing range of around 3cm, but this range does not scale linearly. For example, assuming a scaled sensor reading in range 0-1, 0-0.5 is covered by the first ~5mm of distance from the sensor, while the distance around 2-3cm from the sensor only covers around 0.9-1. As a result, the ML model can more accurately register the position of the string when they are pressed close towards the neck. The effect of this is twofold. Firstly, it results in an audible ‘squelching’ sound as the ML model struggles to determine the pitch when first pressing a string. Secondly, it also means that the quieter volumes are less accessible to the performer while also maintaining accurate control of pitch. This could be partially solved by reducing the distance between the neck and the string.
There is also simply the limited precision of my dataset collection method and of the frame itself. Because the sensors are quite sensitive to light, I collected the dataset in a windowless room in near complete darkness. This meant my hands did not block any ambient light reaching the sensors, but it also meant my measurements were never quite exact. This was compounded by some inaccuracies in the fabrication of the frame and the sensor placement; while I tried to be as precise as possible by measuring twice and sawing/gluing once, this being a handmade prototype so nothing is exactly square.
The result is that, while I intended for the pitch to be linearly mapped across the length of the string, it is more sensitive in some areas i.e., the middle, than it is at the ends. This means that pitches are found mostly by ear rather than by feel, as they are often not exactly where the performer expects them to be. In turn, this acts as a barrier to intuitive control of the instrument.
Take a Listen
Now you’ve read about it, take a look at the demo and performance video: