The Psychedelic Journey of an Unexpected Spaceship
The Psychedelic Journey of an Unexpected Spaceship
Firstly, I want to encourage you to watch the performance related with this project before diving into the details of what is actually happening behind this audio-visual experience. You will find a video below.
The Concept
This project is the result of the task required for the Physical Computing module at MCT4000 course: “Shape an interactive system and present it as a short musical performance”. Considering this description, I though firstly in a technological solution to support such application before the actual performance.
I have experience in game development and multimedia systems by using the Unity game engine. A widely used platform for interactive systems, mainly intended for game development but not limited to it. So I proposed to implement two applications, a mobile controller for an Android device, and a PC application (in my laptop) that receives the data from that controller and generates synchronized sounds and visuals.
However, It just raised the question of what I actually would do in a short time. At that point, I started to think about the performance. My intention was to have a base percussion track and build musical layers at the top of that, manipulate some sound and effects parameters in real-time, and reflect it in an ethereal visual environment according to the music.
To some extent, I think that I managed some of my vision, but it was a quasi-improvised process, mainly regarding the visuals because the combination of graphic effects and objects results in a strange experience in the space. In fact, the central object, which is a flattened sphere, looks like a spaceship (an UFO some mates said) and I was not aware of that.
In addition to the unexpected spaceship, some classmates highlighted the use of the blending of colors and shapes. Therefore, after a “deep introspection” I came to the conclusion that it was like a psychedelic journey of an unexpected spaceship. Maybe some of you agree.
The Implementation
As I mentioned before, this system was implemented in Unity and is composed of two applications, an Android mobile controller, and a PC software for a Windows laptop.
Both applications are communicated through OSC messages. In order to achieve this, I used a script from UnityOSC, an open source project developed by Thomas Fredericks. The mobile application sends messages and the laptop receives them.
The Mobile Application
This applications is composed of a simple UI interface and its purpose is to send sensors’ data as well as specific commands through OSC.
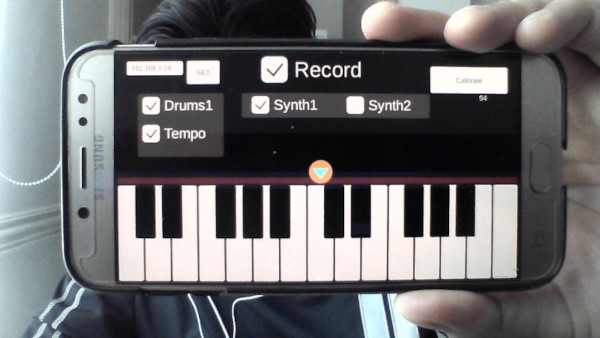
The sensors used are the light sensor and the attitude sensor whose support is given by the relatively new Unity Input System. The commands are managed by the user interface depicted in the image below.

This interface has the following elements:
- A text box to provide the local IP address for the machine where the data is going to be sent.
- The SET button that reinitializes the app with the provided IP address.
- A Calibrate button to take base measurements for light and attitude sensors in order to normalize this data.
- The Drums1 checkbox to activate or deactivate a drums sample.
- The Tempo checkbox, that is actually a command to activate or deactivate the influence of the attitude sensor over the drums sample (It is called Tempo because that was the first intention, but actually it controls the cutoff frequency for a Low Pass filter in the drums track).
- The Synth1 and Synth2 checkboxes that are grouped to activate or deactivate the influence of the virtual keyboard over one of the two tracks associated with those elements.
- The virtual keyboard which is a set of buttons that send MIDI data (note_on and note_off) routed over Synth1 or Synth2.
- The Record button that is used to record a segment of MIDI commands from the keyboard considering the Synth (1 or 2) that is activated in that moment. Basically it is for the interaction of a simple looper.
- There is also a small label under the Calibrate button which represents the value of the light sensor.
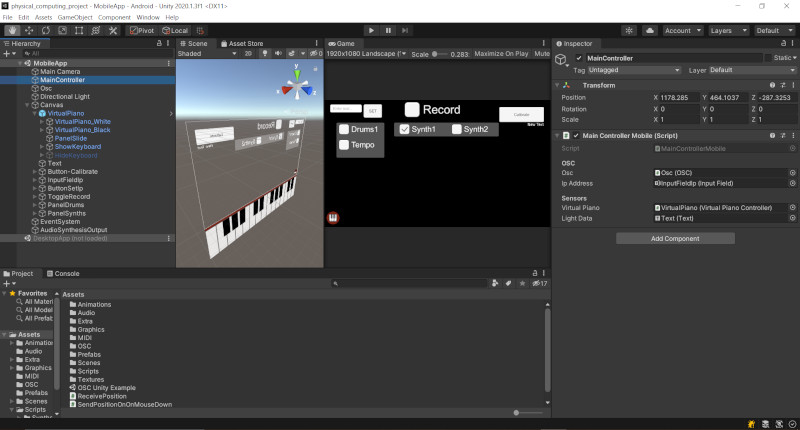
All of theses interactive controls send OSC messages and none audio or graphics processes are carried out in the mobile device. You will find a picture of the Unity development environment for this solution below.

The PC Application
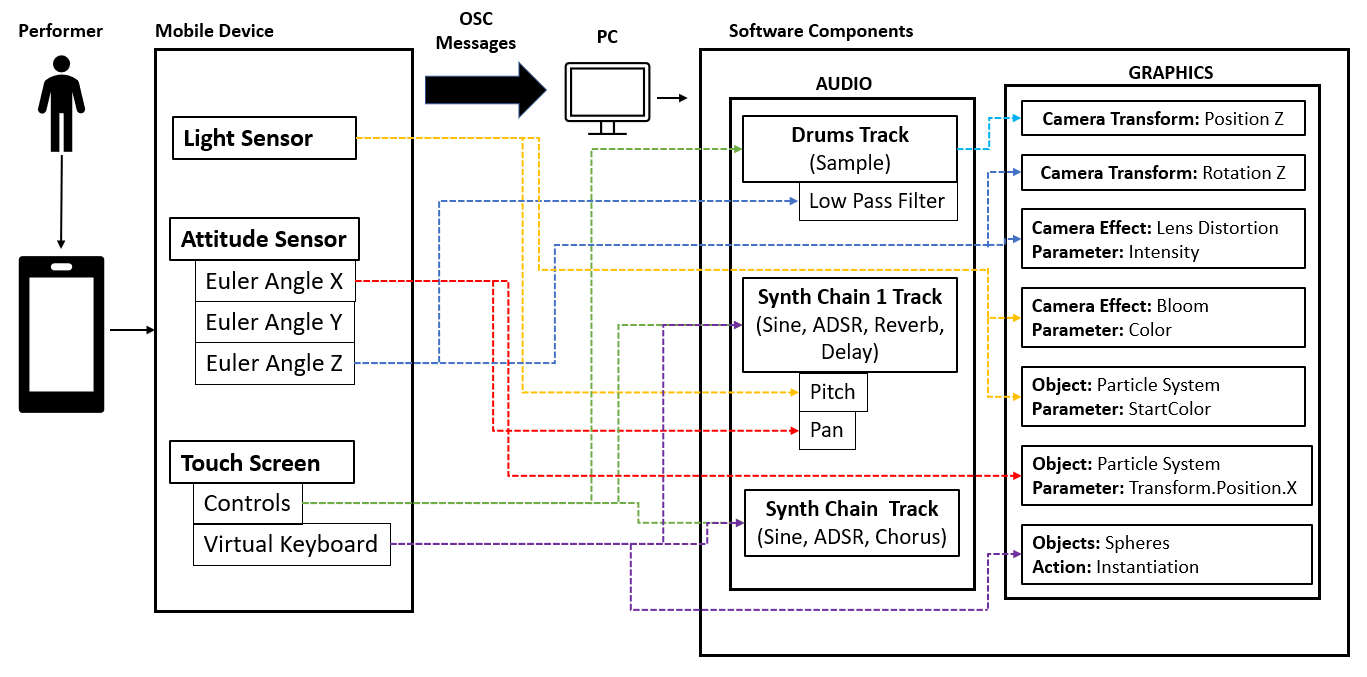
This piece of software is more complex and all the heavy process happens here. This solution deals with both, sounds and graphics processing. A complete schema regarding the communication between the mobile and the PC app is shown below.

The previous figure describes the mapping between the mobile device parameters sent through OSC and the PC modules that interacts with those messages. Note that one parameter is able to control two or more modules in terms of audio of graphics. For instance, the light sensor manipulates the pitch for Synth1 (audio) as well as the color for a Bloom camera effect and the color for particles (graphics effects and objects). Taking this example, refer to the picture to relate all the messages between the mobile app and the PC app.
I want to focus more in the audio segment of the PC application, in which the following elements are important for the operation of this software:
- Audio Files Playback: Unity, as many other game engines, is generally intended to use audio samples for the soundscape, that is, sound effects and music, which are key elements in such interactive systems and are represent as components called Audio Sources. In this case, the only element that is used in this way is the Drums Track, which is pre-recorded and has a strict length of two bars. The tempo for the performance is based on this track.
- Synthesis Processing: Unity is able to attach custom filters to Audio Sources in order to generate new sounds or manipulate an existing one considering mathematical calculations over audio samples. I used this feature to implement a synthesis chain structure for generating sounds. For this case, I used only three modules for each chain Synth1 and Synth2, which are: A sine wave -> ADSR Envelope -> Output. The sine wave used the sine math formula over samples, the ADSR envelope receives the MIDI data from notes sent by the controller and allows a simultaneous reproduction of notes wrapped in an amplitude envelope with default ADSR values, and finally the Output receives the last element in the chain and put it in an Audio Source through a custom filter.
- Audio Effects (like filters): Another audio feature in Unity is the possibility to use its built-in filters, which are audio effects over Audio Sources. That is why, despite Synth1 and Synth2 use the same synthesis chain, they sound different, because Synth1 has a reverb and a delay filter attached, while Synth2 has a chorus filter.
- Looper: In order to have a multi-track experience, I implemented a very simple looper by recording just the MIDI commands in a segment of time defined by the performed when he or she activates or deactivates the Record checkbox. It only happens for Synth1 or Synth2, one in a time.
In terms of graphics. I used the post-processing queue for the virtual camera and basic objects like spheres or simple particle systems. Some effects are just in there (like the moving background) and others reacts according to the performance because they are associated with sensors or controls (as shown in the previous image).
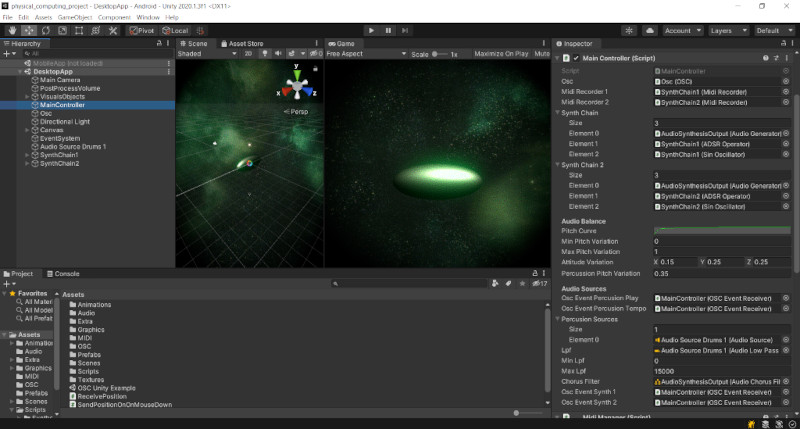
The PC development environment in Unity is illustrated below.

Conclusion
I really enjoyed to implement this system despite it does not reflect my complete vision, but I understand that it was very ambitious to try an implementation of such digital instrument. However, It was fairly enough for the time that we had to solve the task.
Among all the elements that I developed, I realized that it is complicated to make a looper, I can imagine that there are tons of work in tools like Ableton to achieve something like that.
Regarding the platform that I used, I think Unity is good for fast prototyping of complex interactive systems, nevertheless, in terms of audio generation, there is still some things to solve to rid of some artifacts that are present in the outcome. That is why I will explore to integrate an actual synthesis engine to Unity (maybe PureData, SuperCollider, etc) and process all the audio through those platforms. The result will be better if some calculations are performed by the right tools.
Finally, I want to say that the unexpected could lead to new possibilities, just be open to experiment several approaches.
