Real-time audio processing with oscHook and Reaper
Introduction (task + idea)
For our Physical Computing project we had to use sensor data to control certain parameters of audio processing using already-built software, in order to get a basic understanding of data sources and the linkup to musical parameters.
Having had no previous experience in this field, and (very) limited knowledge on how to use a DAW, my idea was to transmit data from my phone’s sensors, using oscHook, through the OSC Router to Reaper and controll some of the effects applied on different tracks of a song in real-time. A simple enough idea… if you know what you’re doing, which I was not.
For this assignment I used the following softwares:
Setup (technical)
As a novice regardig both parts of this task - on one hand seding sensordata to a DAW in real-time to control parameters’ values and on the other hand tweaking parameters and effects in a DAW for audio processing purposes - I had to approach things systematically.
First step was to send data from my phone to the OSC Router and then in Reaper. After installing the necessary software and with some help, I managed to do it successfully, but I found it important to document the process - if nothing else, for future reference since it’s likely that I will forget some steps and get frustrated if I ever try to do it again from scratch. Also because it was a substantial step, taking me almost as much time as the other part of the task. So, in this section I will write a few important steps that shouldn’t be skipped and some troubleshooting notes.
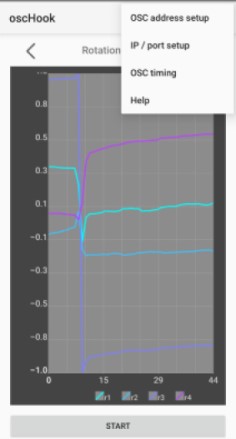
oscHook
-
Go to
IP/port setupand write the IP address (e.g. 192.168.1.51) and the port you want to use (e.g. 7400). An easy way to find this is to open a command window (on Windows) and type “ipconfig” and it will show there. -
Go to
OSC address setupto select which sensor data you want to transmit (e.g. theCompassandLightdata) and see the related paths/parameters for each sensor (e.g./orientation/azimuth).
OSCRouter and Reaper
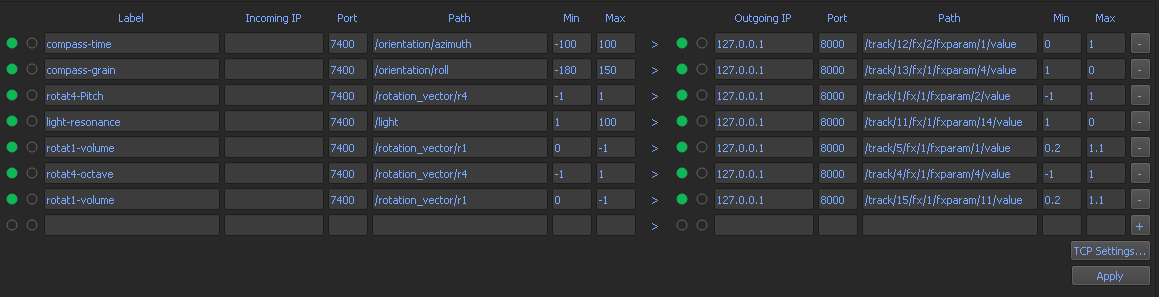
The OSC Router interface shows the incoming data on the left (info about the oscHook app) and the outgoing data (info about Reaper) on the right.

Incoming IP
- Defining the
Labeland theIncoming IPis optional. - The port has to be the same as the one used in the oscHook app (e.g. 7400).
- The
pathdepends on the sensor and the parameter data you’ll be sending from the oscHook and can be found underOSC address setup(e.g./orientation/azimuth) -
The
MinandMaxvalues refer to the scalling of the sensors’ parameters (e.g. forCompass, theazimuthparameter is scalled between -180 and 180). - Add another line for each different sesorsdata (e.g. if you want to use all parameters of the
Compassyou need to fill them in separately).

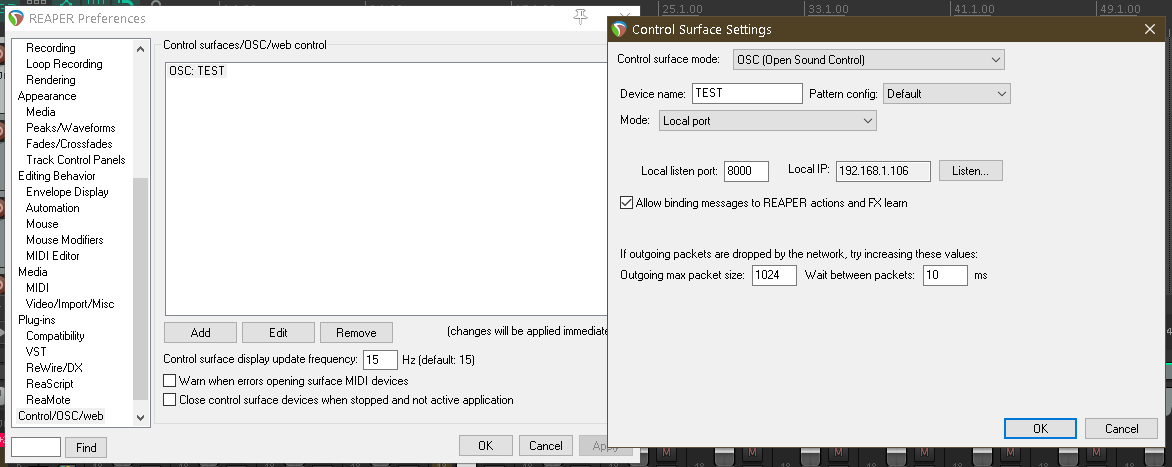
Reaper settings
- Open Reaper, go to Preferences and then to Control/OSC/web.
- Add a Control Surface Mode = OSC (Open Source Control).
- Give a name to the device (e.g. “Test”) and set the mode to Local Port.
- Set a port for the
local listen port(e.g. 8000) and write yourLocal IP(e.g. 193.157.251.241).
Outgoing IP
- Use the 127.0.0.1 IP address for the
Outgoing IP(that’s an “internal IP”, because you’re sending the data between two apps/softwares on the same computer). - Write the port you chose in Reaper in the
Port(e.g. 8000). - In the folder you saved Reaper (probably in the C: partition) find a document with setup information for defining paths for editing audio effects of certain tracks. The only one I used is “n/track/@/fx/@/fxparam/@/value”, where you will need to remove the “n” at the beginning and for each “@” write the number of the track, the effect and the parameter respectively. See the photo with the OSC Router Incoming IP example from earlier, the Outgoing IP details are also visible.
- For the
MinandMaxwrite the scaling of the effects’ parameter (e.g. between 0-1).
Troubleshooting and other notes
-
For a more reliable data trasmission try to change the
OSC timing(e.g. re-sending data every 100 ms) in the oscHook app. -
To minimalize the delay between the movement of the phone (so the sensor data) and the change in effect parameters (in Reaper), only send the data for the sensor that you need. This can be chose in
OSC address setupin the oscHook app (e.g. only theCompasdata). -
Remember to connect both devices (your phone where you have oscHook and the computer where you have the OSCRouter) to the same wi-fi.
-
If you are changing the wi-fi you’re connected to, you most likely have to restart the OSCRouter, to change the network permissions.
DAW audio effects, parameters and scaling
As I mentioned before, I have no previous experience with audio processing, so I couldn’t create a song from scratch. I searched for one on Mixing Secrets and downloaded Sun Drenched by Mike Skalandunas.
In terms of effects, I downloaded the Sound Hack Delay Trio and used the bubbler, the delay and pitch delay. I also used Reaper’s built-in Cockos ReaPitch. I used certain sensors and parameters transmitted by oscHook to control parameters of these effects. See below more details of each effect, how it was controlled and the scaling.
Audio tracks with their effects
Checking each track individually, and knowing the effects I wanted to use, I decided which effect would be paired with what track. The scaling of each parameter was decided experimentally - setting up the (scaling) boundaries for each parameter allowed me to controll more parameters at the same time. See the “sheet” presented further down for more details on what effects were used at what times.
Track 1: French Horn 2
- Effect: Pitch Delay (Sound Hack) — Pitch Factor
- Sensor: Rotation Vector — r4
Track 4: Malaysian Djembe
- Effect: Pitch Delay (Sound Hack) — Octave
- Sensor: Rotation Vector — r4
Track 5: Percussion 1
- Effect: ReaPitch (Cockos) — Volume
- Sensor: Rotation Vector — r1
Track 11: Psaltery
- Effect: Delay (Sound Hack) — Resonance
- Sensor: Light
Track 12: Pad 1
- Effect: Delay (Sound Hack) — Time
- Sensor: Compass — azimuth
Track 13: Pad 2
- Effect: Bubbler (Sound Hack) — Grain Size
- Sensor: Compass — roll
Track 15: Violas
- Effect: ReaPitch (Cockos) — Volume
- Sensor: Rotation Vector — r1
Scaling
For a smoother control of the parameters’ values, I changed the scaling manually for each effect. Below it’s a screenshot of my final OSCRouter settings.
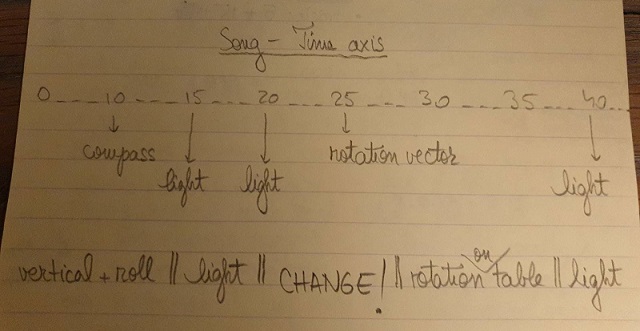
Performance demo + (time axis sheet)
Important note! After scaling the parameters, try to keep the exact same light conditions before recording or working on it again. You might notice that the scalling is totally off if you scale the parameters in the middle of the day, near a window, and then record a demo at midnight with only a lamp for light (as it was my case).
Here is the video of the final performance. On the front camera view you can see the way I’m moving the phone to control the parameters’ values. In Reaper you can notice the effects’ windows and how the bars are moving based on the phone’s movements.
Here is the “sheet” I used to know when to use what effect, based on the time axis of the song. In order to minimize the delay between transmitting the data to the OSC Router and then to Reaper to control the effects’ parameters, I sent the Compass data and the Rotation Vector only when needed it - aproximatively halfway through the song I went to the OSC address setup, unchecked Compass and check Rotation Vector. The Light sensor was always on, since it was not taking that much bandwidth.
Usability
Originally, I thought of a way to make classical music performances more interactive and interesting (especially for the youth). In the example described in this blog post I didn’t use a classical song, but the concepts are the same.
The way I imagined it, each audience member would get the oscHook app and get control over an instrument. Then, during the performance, there would be specific times when the can send data to the OSC Router on the (let’s call it) conductor’s compuetr who has everything set up from before: what sensor controls what effect and parameter.
Of course, there would be hard to have control over when the audience members are using their phones to influence the performance. However, this can be solved if the effects controlled by the sensors would be time-bounded - for example the Rotation Vector would have control of the bubbler effect on track 5 only between second 1:21 - 1:35. In my view in would make for a highly interactive, messy, and maybe sloppy but amazing performance.
Limitations and final thoughts
The biggest limitation of this project was probably my own lack of knowledge regarding audio processing. Have I known more about audio effects and how to use them, the tasks would have been easier and the demo nicer. While playing with it I had many ideas of how I wanted to make it sound like, but I didn’t know how to do it. That’s why the order of the steps I took might seem a bit strange: I found some effects I liked and then looked for a track they would fit on, intead of thinking “ah, this track needs a bit of this and a bit of that to sound better”.
Overall, this project was a gread opportunity for me to dip my toes in the audio processing world as well as exploring how to use accessible technologies to apply real-time interactive systems for music performance.